Friday, January 22, 2021

What Is YouTube CPM? [+ Why It Matters]

With over two billion monthly active YouTube users, YouTube is an undeniably powerful channel for advertising — which means, if you're a YouTube creator, there are plenty of opportunities for you to make money off the platform. 

For instance, if advertisers pay to display ads on your videos, you can increase revenue in the form of CPM. 

Along with increasing your revenue, CPM is a strong indicator that your content is valuable, and helps you identify businesses with whom you may want to partner down the road. 

Whether you've been a YouTube creator for years or are just starting out, CPM is an important metric to understand to ensure you're maximizing YouTube's potential as a revenue generator. 

Here, we'll explore what CPM is, how it's calculated, and what makes a "good CPM". 

What is CPM, and how is it calculated? 

CPM, or cost per 1,000 impressions, is the cost an advertiser needs to pay on YouTube for every 1,000 impressions their ads receive on your video.

CPM varies depending on how much an advertiser pays to display the ad. Ad price on YouTube depends on a range of factors, including bidding price, type of ad, and consistency. 

So, for instance, let's assume an advertiser is paying $9 for an ad, and the ad was seen 5,000 times on your video. To calculate CPM, you'd divide 9 by 5,000 = $0.0018, then multiply $0.0018 by 1,000.

The CPA, then, is $1.80. You'll receive 55% of that $1.80 — since YouTube takes a percentage of the CPA, as well (45%, to be exact). So if you make $1.80 CPA off an ad, you'll only keep $0.99.

Additionally, there's another type of CPM: playback-based CPM. Rather than calculating the cost the advertiser pays for 1,000 impressions, playback-based CPM calculates the cost an advertiser pays for 1,000 video playbacks where an ad is displayed. 

There are free calculators available online, if you don't want to calculate your CPM manually. And while individual videos' CPMs might seem small (like the $0.99 made, above), it can add up to a hefty monthly earning if plenty of businesses see your videos as consistently worthwhile platforms for their promotions. 

Why is CPM important? 

As a YouTube creator, CPM is an important metric for analyzing which of your videos are most valuable to advertisers. Since advertising is the primary method for monetization on YouTube, this is critical information. 

To make a full-time career out of YouTube, it's critical you know which videos can be monetized so you can create a more efficient, long-term strategy to target those types of topics. 

For instance, perhaps you create YouTube videos for beauty, health, and wellness — but you find, in particular, "Drugstore Makeup Tutorials" receive the highest CPMs. This might suggest you should create more content that aligns with that topic. 

Additionally, you might find one business in particular consistently advertises on your videos. If the brand aligns with your own values, you might reach out directly to discuss other YouTube partnership opportunities, like affiliate marketing. 

Average CPM on YouTube 

CPM varies greatly depending on how much an advertiser pays to distribute an ad on your video. 

For instance, let's say an advertiser pays $10 for an ad that plays on your video, which has 1,000 views. If that's the case, you'd make $10 CPM (10/1,000 x 1,000). Of course, then, you'll need to take 45% off that total — making your earnings around $5.

However, in most cases, the videos on which businesses choose to advertise will have more than 1,000 views, making your earnings closer to $7-$10. 

Jilliian Hope, HubSpot's Senior Manager of Brand Advertising, agrees, telling me her team typically sees an average of $7 to $10 from past campaigns. 

However, CPM varies by country. For instance, one source reports the United States has an average 0.38 CPM, while Spain is 4.38, Switzerland is 3.87, and Mauritius is as high as 7.05. This means the amount of money you make off YouTube depends, in part, on your geography. 

Highest CPM on YouTube

The highest CPM varies by country, but here's a list of the five highest CPA rates by country, as reported by one source:

  1. Maldives: $15.47
  2. Guadeloupe: $10.97
  3. Denmark: $10.61
  4. Poland: $9.23
  5. Pakistan: $7.54

Additionally, certain niche topics will ultimately have higher CPMs. Industries that a) perform well on YouTube and b) are incredibly profitable, will perform better in terms of CPM. These industries include:

  • Makeup
  • Retail
  • Health
  • Finance
  • Technology 

As a brand, you should use CPM as a metric to help you identify which topics seem most valuable to advertisers, since those topics likely provide the most opportunity for monetization. 

Rather than looking for "quick tricks" to increase your CPM, however, you'll want to play the long-game by creating a comprehensive YouTube strategy that helps you increase sales, reach new audiences, and grow brand awareness. 

Posted by https://bit.ly/31tHUKW

Thursday, January 21, 2021

A Plain-English Guide to Market Research

In some circles, market research is a catch-all term for asking the industry what it wants. "Do we know what the demand is for this product? Who's even looking for our services? Let me do some market research to find out," someone might say.

But what does that actually mean?

Here's a simple definition of market research that encompasses all the possible goals of this practice, in fewer than 100 words:

Market Research Definition

Market research is the process of examining an industry's buyers, the product these buyers want, and where they're currently getting it. By engaging the right people and data, a business can use this research to position itself in the market and predict where the market will go in the future.

Market research can answer various questions about the state of an industry, but it's hardly a crystal ball that marketers can rely on for insights on their customers. Market researchers investigate several areas of the market, and it can take weeks or even months to paint an accurate picture of the business landscape.

However, researching just one of those areas can make you more intuitive to who your buyers are and how to deliver value that no other business is offering them right now.

Certainly you can make sound judgment calls based on your experience in the industry and your existing customers. However, keep in mind that market research offers benefits beyond those strategies. There are two things to consider: 

  1. Your competitors also have experienced individuals in the industry and a customer base. It's very possible that your immediate resources are, in many ways, equal to those of your competition's immediate resources. Seeking a larger sample size for answers can provide a better edge. 
  2. Your customers don't represent the attitudes of an entire market. They represent the attitudes of the part of the market that is already drawn to your brand. 

Here are some examples of insights you can gain from market research:

  • Consumer attitudes about a particular topic, pain, product, or brand
  • Whether there's demand for the business initiatives you're investing in
  • Where to advertise or sell to (geographically or online)
  • Unaddressed or underserved customer needs that can be flipped into selling opportunity
  • Attitudes about pricing for a particular product or service

Getting answers to these questions based on real data can help you make sound business decisions and minimize risk.

Types of Market Research

To give you an idea of how extensive market research can get, consider that it can either be qualitative or quantitative in nature -- depending on the studies you conduct and what you're trying to learn about your industry. Qualitative research is concerned with public opinion, and explores how the market feels about the products currently available in that market. Quantitative research is concerned with data, and looks for relevant trends in the information that's gathered from public records.

Let's talk about four different types of market research studies you can conduct, a potential goal of each one, and how these studies help you better understand your market.

Interviews

Qualitative information

Interviews are the personal, one-on-one conversations you can have with the buyers in your industry. You can conduct interviews in person or over the phone.

Your interviewees can answer questions about themselves to help you design your buyer personas. These buyer personas describe your ideal customer's age, family size, budget, job title, the challenges they face at work, and similar aspects of their lifestyle. Having this buyer profile in hand can shape your entire marketing strategy, from the features you add to your product to the content you publish on your website.

Focus Groups

Qualitative information

Focus groups are similar to interviews, but in this case, you're assembling a large group of people for one shared interview. A focus group consists of people who have at least one element of your buyer persona in common -- age or job title, for instance.

This type of market research can give you ideas for product differentiation, or the qualities of your product that make it unique in the marketplace. Consider asking your focus group questions about (and showing them examples of) your services, and ultimately use the group's feedback to make these services better.

Surveys

Quantitative information

Surveys are a form of quantitative research, and you can distribute them over the phone, via email, or through an online survey. A survey could cater to people who've downloaded content from your website or interacted with a member of your business.

Enough completed surveys can help you determine your customer satisfaction level. This denotes how happy your customers are with what you're selling them. You might include questions like, "How well did we solve your problem?" and "Would you recommend our product to a friend?"

Secondary Data

Quantitative information

The interviews, focus groups, and surveys are all sources of primary data. Secondary data, on the other hand, is the public information -- online and offline -- that characterizes your industry. This includes competitor websites, social media business pages, trade magazines, market reports, and even census data published by the government.

If you examine enough secondary data, you can learn how much brand awareness you have in the marketplace compared to the companies that provide the same product or service as you.

The market research you perform doesn't have to include every source of information described above. What data you collect will depend on the needs of your business and what you might be most interested in at the moment. 

Editor's note: This post was originally published in July 2018 and has been updated for comprehensiveness.

Posted by https://bit.ly/31tHUKW

Best Display Advertising Campaign of 2020

These are the best display advertising campaigns of 2020. And yes, while there may be many reasons 2020 was a year to forget – it did still produce many remarkable display ads.

Whether alone in the office, working remote, or surviving home-schooling, designers and marketers collaborated via the cloud to get the job done. At Bannerflow we are proud that for many of our customers our advertising platform was up to the task when it mattered most.

Finding the Best Display Campaign of 2020

Every year, there are seasonal winners of our display campaign competition and this year there were four notable entries. Not only do they show design flair and technological know-how but did so under the most extreme of circumstances during the past year.

However, from our quarterly winners there can be only one ultimate winner!

But first, a reminder of 2020’s seasonal champions…

Winter 2020: ATG

And after much deliberation, the first winner of our best display advertising campaign competition for 2020 went to Swedish betting company ATG.


ATG’s emotive and sleek display campaign uses video to show a different angle to the world of horse racing. It’s also a great example of how to be clever and creative with existing resources.

Even before the onset of the Corona pandemic, ATG reused b-reel footage from an earlier campaign to create something that was new and fresh. Over the course of 2020 this would become a creative trend for many other brands and one that helped deal with the real-world impact of working during a pandemic.

Display campaign of the year Daniel F ATG

Read more about how ATG produces its display campaigns and this in-banner video campaign here.

Spring 2020: City Gross

Spring was a testing quarter for many brands but digital advertising rose to meet the challenge head-on, with some exciting and experimental campaigns. And Swedish supermarket chain City Gross’ winner of our spring best display campaign was no exception.


Designed using our latest ad creator, Creative Studio, it incorporates both rich media animation and video to grab the customer’s attention. Best of all, it uses well-chosen Easter-related recipes!

Display campaign of the year Sanna-Maria City Gross

Read how City Gross, Art Director, David Sundh and his team created display advertising during the spring. Plus, how they were able to move into working remotely.

Summer 2020: CM.com

Summer’s winning campaign from CM.com is a great example of a strong message and animation combining to make something more powerful. Remarkably it was also the first campaign the team at CM.com built and published using Bannerflow!


CM.com’s display campaign was designed to help launch its latest mobile marketing platform. And its concept of turning an anonymous profile into a person with preferences and habits using HTML5 animation was a great way of showcasing the idea of how its personalisation offering works.

Display campaign of the year Cecilia Cm.com

Read how the CM.com team went about creating their first campaign using Bannerflow.

Autumn 2020: Supla+

The last entry for this year’s competition was a great example of a Black Friday campaign. Supla+’s winning campaign engages through HTML5 animation and makes a visual impact through its premium feeling design.


Supla+’s campaign was designed as a cross channel digital advertising campaign for social, display and email channels. Uniquely it evokes the 1980s in its design choices, through the use of neon signs and colours. It also uses a rich media widget countdown timer to display to the viewer the time remaining on the Black Friday offers.

Display campaign of the year Tony Supla+

Learn how Art Director, Sanna-Maria Pihl designed and built her winning Black Friday campaign.

The winner of best display ad campaign of 2020: ATG

Finally, the ultimate winner of our 2020 competition went to Swedsih betting company, ATG, for its beautiful and resourceful winter campaign.


We caught up with Graphic Designer, Frida Bergsten, and ATG’s Senior Designer/Creative Lead Mattias Hallbom.

Bannerflow ATG team

Congratulations on winning Bannerflow’s Best Display Advertising Campaign of 2020! How do you feel?

Frida Bergsten, Graphic Designer, ATG: Happy and Proud.

Mattias Hallbom, Art Director, ATG: Surprised and excited!

What is it in your opinion that makes your campaign so great?

Frida: There is a calm, warm feeling in the banner which I think is nice. The video clip, together with the copy, tells the story of the interaction between the jockey and the horse before a race. Which I believe makes the banner interesting.

Mattias: For me, it’s the cinematic feeling, the calmness and absence of a pushy selling message which makes the campaign stand out. All together I think it makes ATG appear confident, bold and trustworthy.

What are you looking forward to achieving across digital advertising in 2021?

Frida: Keeping up with what is happening across different digital advertising trends, etc. As well as, continuing to increase the creativity we show within our banners.

Mattias: I hope we can continue to explore this path when it comes to content/the tone of voice in our communication. Plus, also within the technical aspect of what we do – using more video, motion, and effect widgets.

Thank you to all our ad creators

Everyday countless marketing teams design and publish display campaigns using Bannerflow. And these four quarterly winners are the tip of the iceberg when it comes to the sheer volume of display ads!

Last year our in-house team sifted through many different entries, from all sectors, and different parts of the world. And it was our pleasure to view the range of remarkable ads our customers produce! Today, creativity is very much valued for the return on investment it brings and nowhere more so is this clear than within display advertising.

Lastly, apart from Bannerflow, what all the teams we talked to over 2020 had in common was a drive to constantly produce the best advertising they could. Here’s to 2021 and better times ahead!

Like what you see?

If you would like to find out more about how Bannerflow and Creative Studio can help your marketing team design and produce remarkable display advertising campaigns then please get in touch, or apply for a demo.

How we selected the winning campaign

Bannerflow’s Customer Success, Product and Operations teams, as well as co-founders Daniel FahlĂ©n and Daniel Jacobsson voted on the best display campaign 2020.

Each team member considered the aesthetics, performance, complexity, creative features, and formats of each winning campaign from the year. The campaign with the highest number of votes won the award!

The post Best Display Advertising Campaign of 2020 appeared first on Bannerflow.

Posted by https://bit.ly/31tHUKW

What's a Conversational Landing Page (& How Do You Create One)?

Marketers have found that conversational experiences on landing pages (such as chatbots and live chat) convert three-to-four times more than a traditional landing page. Additionally, a report from Juniper Research predicts that by 2023, the adoption of chatbots across the retail, banking, and healthcare sectors will save businesses $11 billion annually.

So, what do these conversational experiences entail and how should chatbots be incorporated on your landing pages to increase conversions while saving your team time and resources?

Conversational Landing Pages

In this blog post, we’ll talk about what conversational landing pages are, what makes them unique, and how to create one of your own.

Let’s dive in.

Automate and scale conversations on your website with HubSpot’s Chatbot Builder Software.

A conversational landing page may also answer visitor inquiries, resolve challenges, share specific offers, and guide customers to whatever it is they need via chatbot or live chat.

If your landing page only includes a chatbot for visitors to interact with, you may customize the bot so it can detect complex issues that require the support of a human — then, the bot can direct visitors to live chat.

What makes conversational landing pages unique?

In addition to conversational landing pages, there are two other main types of landing pages that are used to engage visitors: traditional landing pages and hybrid landing pages.

A conversational landing page looks something like this, with the chatbot conversation filling up the entire screen for the visitor:

conversational langing page example

Source

A traditional landing page is one that engages visitors with a traditional lead generation form. The lead generation form is placed among other content on the landing page. It asks for information from visitors (e.g. name, email address, zip code) in exchange for something (e.g. discount code, subscription, or trial).

traditional langing page with a lead generation form example

Source

A hybrid landing page combines features from both a conversational and a traditional landing page — it’s essentially a traditional landing page with a chatbot (which can be expanded or be minimized) embedded on the page.

hybrid conversational landing page example

Source

Now that you've seen these other two types of landing pages, you may be wondering, “Why should the chatbot/ live chat conversation be the only thing on a conversational web page?”

Fair question.

By making a contextual, chatbot conversation the only thing on a web page, you establish a personal, one-on-one feel that traditional and hybrid landing pages don't provide. This allows you to more easily promote new offers, close more deals, and increase conversion rates. 

How do you create a conversational landing page?

When creating a conversational landing page, you’ll work through many of the same steps — or, at the very least, similar steps — to those you’d follow when creating any other landing page.

1. Set a goal for your conversational landing page.

The main goal of your conversational landing page is to engage visitors. But that doesn’t mean you can’t also set more specific targets for engagement if you’d like to — this is a good way to establish a single focus for your page in order to make it as effective as possible.

Here are some examples of conversational landing page goals:

  • Provide highly-accessible customer support.
  • Share special offers.
  • Convert and upsell leads and customers.
  • Get to know your audience on a personal level and apply that information to campaigns, buyer personas, sales, and more.
  • Collect feedback to improve upon your product/ service, customer experience, and buyer’s journey.

2. Tailor the chatbot to your buyer personas and customers.

Your chatbot should cater to your specific audience. With a chatbot builder — like HubSpot — you can customize your chatbot and use it to qualify leads, book meetings, and create responses to FAQs. You can also configure your chatbot so that it guides an individual with a more complex reason for reaching out to live chat/ a rep. The bot can also create support tickets and add contact data to your lists and workflows to automate tasks and save your team time.

Use HubSpot’s Chatbot Builder Software to qualify leads, book meetings, provide customer support, and scale your one-to-one conversations.

3. Use clear, action-oriented language.

The point of your conversational landing page is to engage and interact with your visitors as well as support their needs, challenges, and goals. It’d be very difficult to do this if your landing page was cluttered, unclear, hard to understand, or difficult to navigate.

So, when working to determine what text you’ll include on your conversational landing page, remember less is more — meaning, your chatbot and any other text on your page should be concise, conversational, and straightforward. This will allow your visitors to have efficient and simple interactions with your brand.

4. Design and brand your page and make it memorable.

Your landing page should be on-brand, thoughtfully-designed, and beautiful — this will contribute to a positive experience on your page for visitors. This step is also when you should ensure your conversational landing page opens in a new tab (this is how the chat will fill up the entire screen).

A landing page tool like HubSpot, which has a drag-and-drop builder and pre-made templates, makes the process of designing a landing page simple, even if you don’t have any website or coding knowledge.

Here are some other landing page elements to consider when designing a memorable page:

  • Font
  • Colors
  • Animations
  • Images
  • Videos
  • Bot/ live chat design
  • CTA buttons

Use HubSpot’s Landing Page Builder to create and test beautiful landing pages that generate leads and look great on any device — no designers or IT help required.

5. Ensure your landing page’s chatbot resolves customer issues and guides them to solutions.

The point of your conversational landing page is to engage visitors in a way that’s beneficial to them (and your business). To ensure your chatbot resolves customer queries and guides users to the solutions they need, customize your bot’s messaging, purpose, and goal.

HubSpot’s Chatbot Builder makes this easy — the builder allows you to select a bot template based on your goal and use the visual editor to customize the bot so it complements that goal and your brand. Customize the bot’s copy and the types of questions it asks visitors. If your conversational landing page doesn’t include live chat on it, then you may configure the bot at this time so it directs visitors with complex issues to your live chat.

Additionally, personalize bot conversations with the help of your all-in-one HubSpot CRM — the chatbot will pull contact record information from your CRM to create a personalized experience for customers on your conversational landing page. Then, after any conversation with a visitor, their contact record will be updated again with any new details.

6. Promote your conversational landing page.

What good is a landing page without any visitors on it?

To make sure your audience and customers know about your conversational landing page, promote it — share links to it on your social media profiles, add a CTA to your main landing page that guides visitors who want to interact with a chatbot to the landing page, and add a link to it on your website’s “Contact” page. This will increase engagement, encourage customers to interact with you, and efficiently and effectively provide the support your visitors are looking for — all while saving you time.

It’s also a great way to proactively inform your customers and site visitors of where and how they can interact with you and get support.

7. Test and analyze your conversational landing page.

To ensure your conversational landing page is as effective as possible, test different variations of the page to see what works best for your site visitors and increases conversions. 

To do this, A/B (or split) test variations of your page (and chatbot) — swap out and test colors, font, messaging, and CTA buttons to determine which combination does the best job of attracting, engaging, converting, and delighting customers.

Begin converting more visitors and delighting customers today with an engaging and memorable conversational landing page. 

Posted by https://bit.ly/31tHUKW

Wednesday, January 20, 2021

How to Use WordPress: Ultimate Guide to Building a WordPress Website

The thought of creating your own website may seem overwhelming.

You might even think this task is impossible for anyone but a developer or a person with a background in web design.

Well, I have good news for you — there’s a software out there that’s so easy to use, virtually anyone can successfully create a unique and professional-looking website for their business, blog, or portfolio. It’s called WordPress.

But how?

This ultimate guide will cover a basic step-by-step process of creating your own WordPress website as well as a list of tips and tricks to remember while working with WordPress.

But first, let’s answer the question most people have when they begin thinking about their new WordPress website: What is the difference between WordPress.org and WordPress.com?

Wordpress.org vs. WordPress.com

The difference between WordPress.org and WordPress.com has to do with who is actually hosting your website.

You host your own website or blog on WordPress.org, through a third-party hosting provider. You also have to download your WordPress software, buy a domain name on a third-party site, and manage your server. It’s a much more hands-on experience than with WordPress.com.

WordPress.com offers to host your website for you. You also don’t need to download any software or manage a server. If you choose WordPress.com, your website’s URL will look like this: https://ift.tt/1Pt8449. However, you have the option to also upgrade your WordPress.com account and buy a custom domain from a third-party provider (meaning your URL will look like this: www.mywebsite.com).

How to Choose Between WordPress.org or WordPress.com

You may be wondering whether WordPress.org or WordPress.com would be a better fit. Let’s review a few more of the pros and cons that come with both options, so you can make an informed decision.

Wordpress.org is ideal if you want full power over customizing and controlling your website. However, there is a lot more responsibility that comes with managing a WordPress.org website. You have to purchase and set up your own domain name, upload and install plugins and a theme, edit your website’s code, and manage your website’s security. WordPress.org is free to use, but you have to pay for everything else that goes into having a website.

WordPress.com is preferable if you’re looking for an all-in-one option that has most of the hard work done for you. You’ll never need to manage your server, pay for your hosting, or buy a domain. There are also a number of customization options that come with a WordPress.com plan to help you make your website look the way you want it to.

WordPress.com has a free and paid version. If you stick with the free version, you can’t upload any custom themes or plugins, and you will have a WordPress subdomain. However, there is always the option to pay for premium upgrades and other plans that provide you with even more features and control, as well as the option to buy a custom domain through a third-party site.

WordPress for Beginners: How to Use WordPress

There are a number of ways for you to create your dream website with WordPress. Users generally find the software easy to use, but getting started can be understandably intimidating if you’re completely new to the process. That’s why we have built this “WordPress for Beginners” guide. Want a quick introduction before you dive deep? Check out this helpful video:

For even more resources, we've also compiled some of the best websites for learning about WordPress — these can be incredibly valuable sources of information as you start you journey.

Below, we will take a closer look at how to start creating your website.

WordPress is by far the most popular CMS today. Its ease of use and versatility enable the majority of users and business owners to create a website that works for their needs. Here’s how you can do the same.

1. Select a WordPress plan (WordPress.com only).

To begin creating your website, select a WordPress plan. As stated earlier, with WordPress.org you only have one (free) plan option — but it requires you to buy your domain, hosting provider, plugins, themes, and everything else related to your WordPress site.

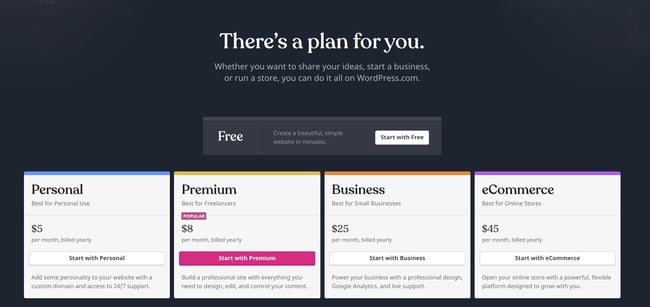
With WordPress.com, you’ll have to choose between the five plans they offer.

pricing plans for a wordpress website

The main differences between these plans are the monthly fee, types of site customization, and the access you get to marketing tools.

2. Set up your domain name and hosting provider.

Setting up your domain name and choosing your hosting provider for WordPress typically happen around the same time in the website creation process.

Before we talk about how to complete those tasks, let’s discuss the difference between your domain name and hosting provider.

Think about your domain name as your home address — it’s how your visitors are able to locate your website on the Internet. You domain name will look something like this: www.example.com.

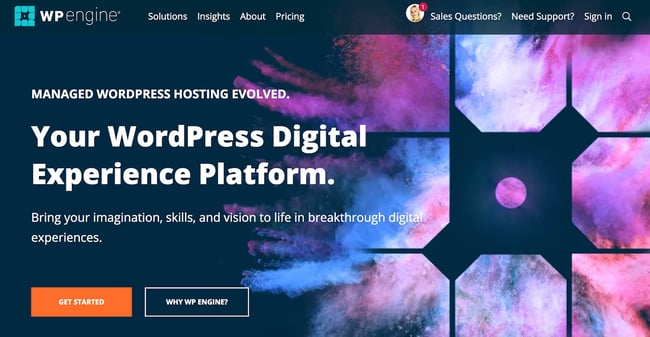
Your hosting provider is like your house — it's where your website files are actually stored. Without a hosting provider, your site wouldn’t have space on a server to “live.” Some of the best WordPressing hosting providers include WP Engine, Bluehost, and Kinsta.

product page for wp engine wordpress hosting

Image Source

How to pick domain and hosting providers

Again, WordPress.org requires you to create your own domain and find a third-party hosting provider for your website. WordPress.com allows you to decide whether or not you want a custom domain depending on the plan you choose, but it takes care of the hosting for you.

Your hosting provider is important because it impacts your website’s speed, security, and reliability. There are hundreds of providers to choose from, which is why we put together a list of 22 of the best WordPress hosting providers to help you decide what will work best for you. All of these providers meet WordPress’ three hosting requirements:

  • PHP version 7.4 or greater
  • MySQL version 5.6 or greater OR MariaDB version 10.1 or greater.
  • HTTPS support
When considering hosting providers for your WordPress site, make sure they meet all of the above criteria.
For domain names, getting one is as easy as searching and purchasing one through your domain registrar of choice. If you are new to WordPress.com but have already purchased and created a domain name elsewhere, no problem — you’ll have the option to transfer or map it to your WordPress website.
For the sake of this guide, let’s assume you do not yet have a domain or hosting provider. Here’s how to start creating your website with the popular hosting service Bluehost.

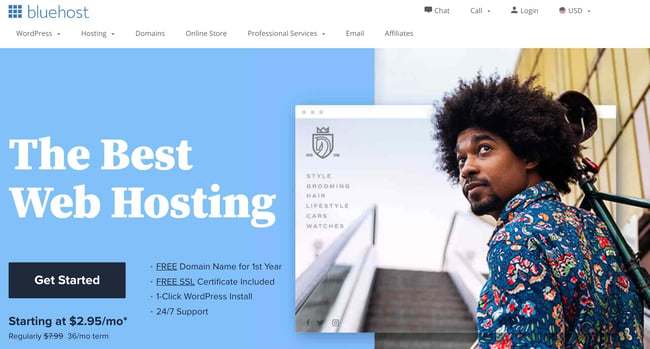
First, head to Bluehost’s website and click Get Started.

product page for bluehost wordpress website hosting

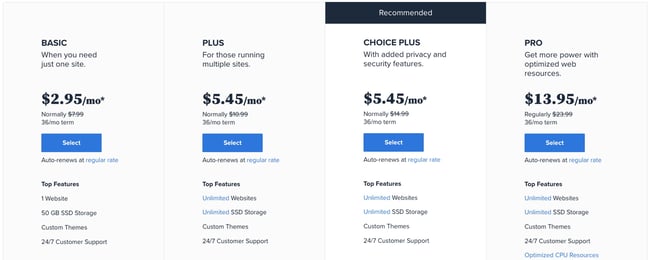
From here, you’ll be taken to Bluehost’s pricing page to choose from four plans.

pricing for bluehost wordpress website hosting

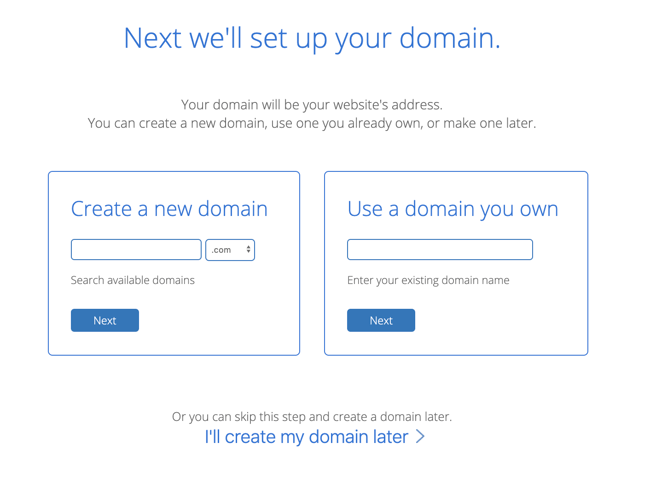
Once you choose your plan and click Select, you’ll be taken to another page to sign up with a domain name.

Bluehost signup page for WordPress website

Image Source

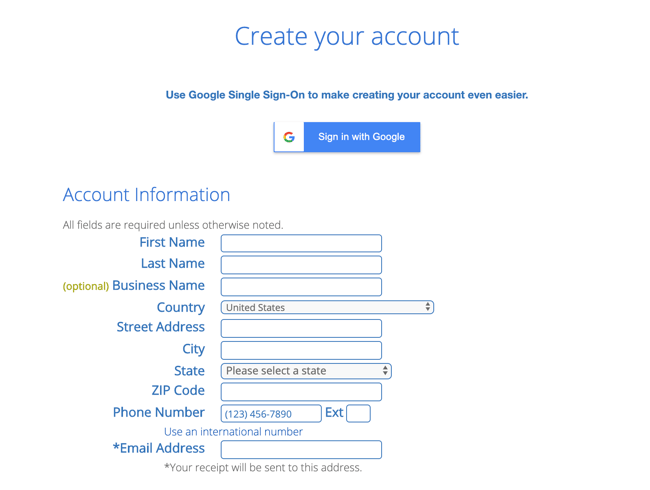
Once you select your domain name, you’ll be brought to a page to complete your account and billing information for your purchase.

Bluehost account page for WordPress website

After confirming your account and purchasing your domain, you will gain access to your hosting dashboard where you’ll be able to install the WordPress CMS.

3. Install WordPress.

If you are using a hosting provider outside of WordPress, you’ll need to install the CMS to connect your new domain to your website.

This time, let’s use GoDaddy as an example. (Don’t worry, no matter the hosting provider you choose, this process looks similar.)

Note: If you choose to use a managed WordPress hosting service like WP Engine or Kinsta, you won't need to go through this process, as those services were built specifically for WordPress and will have WordPress installed for you.

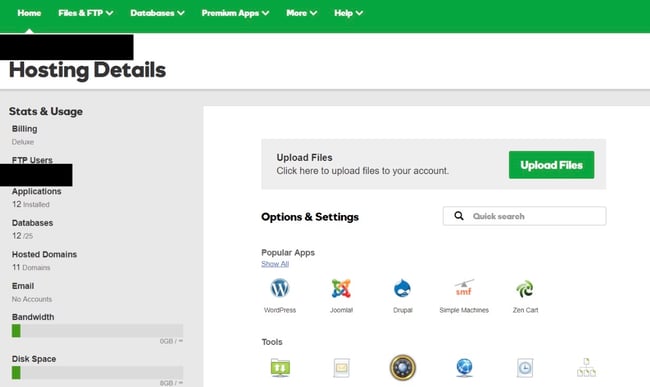
To start, log into your GoDaddy account, click Web Hosting, and then Manage. You will be brought to a screen with your account details.

GoDaddy account for WordPress website

Image Source

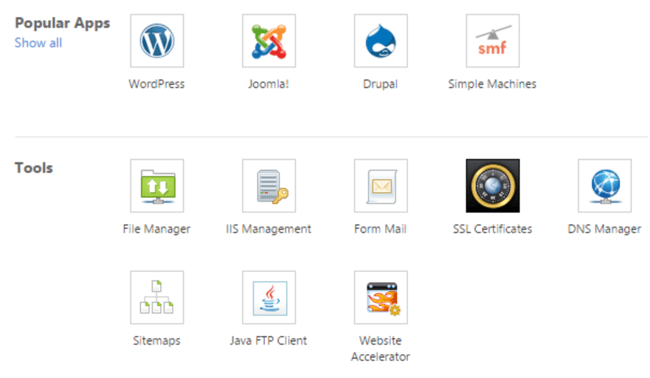
Scroll down and under Options & Settings, you will see an area titled Popular Apps. Click on the WordPress app to begin the installation.

GoDaddy settings for WordPress website

Image Source

After installing WordPress, you'll need to answer a few questions about the domain you want to use, the directory where you want to install WordPress, and your admin information.

After about 24 hours, your website will be installed to your hosting account, and GoDaddy will send you an email confirmation.

Now that you have your domain set up and WordPress installed, you'll next need to set up your “Primary Domain” within WordPress, so your visitors see your website when they search your domain.

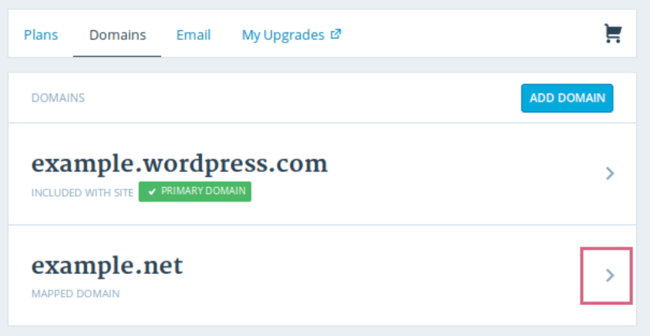
In WordPress, go to My Site and click Domains. Select the custom domain you want to make your primary domain.

Setup custom domain for WordPress website

Image Source

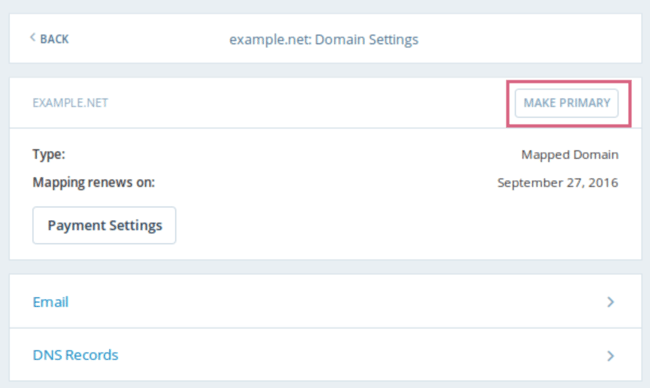
Then, click Make Primary.

domain settings for WordPress website

Image Source

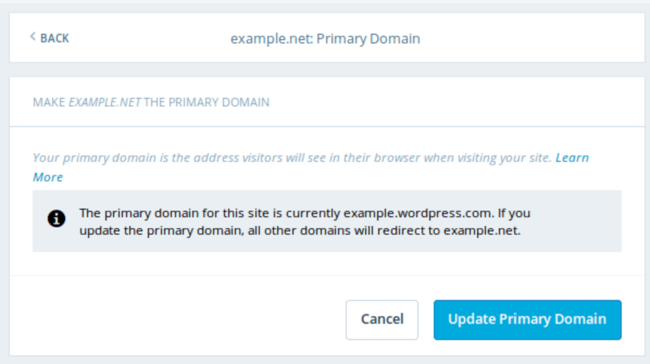
Confirm you meant to make this change by clicking Update Primary Domain.

primary domain for WordPress website

Image Source

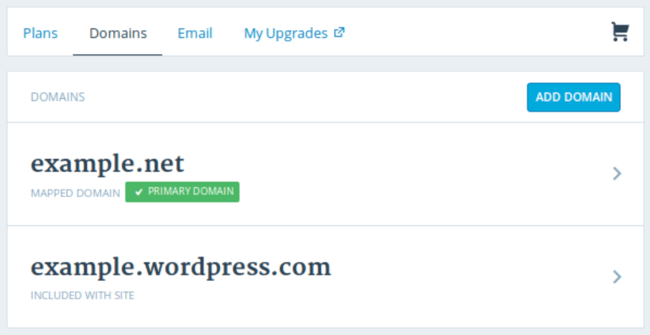
Verify the update was successful by looking for a green box with a checkmark that says Primary Domain.

verify domain for WordPress website

Image Source

Now, on to step four: making your website look nice.

4. Choose your theme.

You can customize your WordPress website using WordPress’ many themes and templates, each of which contains a multitude of layouts, formatting styles, colors, fonts, and other visual options.

WordPress automatically applies a default theme that looks rather plain. You can keep it, but your website visitors may not be so impressed. A custom WordPress theme, whether it’s paid or free, will make your website look appealing and professional to your buyer personas.

Similar to the wide range of hosting providers available, there are also hundreds of themes and templates to choose from. To help you out, we’ve put together a guide to 20 of our favorite themes and templates and categorized them by purpose. Whether you’re looking for a theme versatile enough for multiple different business types, or one suitable for your ecommerce site, portfolio, blog, or business, there’s a theme that will work for your specific needs. On top of your theme, you can further customize your pages with a builder tool like Elementor.

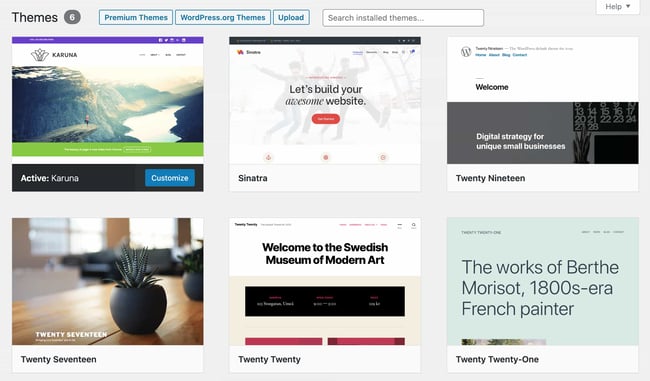
To find a theme that works best for you in WordPress.org, head to your admin dashboard. Click Appearance, then Themes. You'll be brought to another screen where you can browse available themes or search for a specific one you have in mind.

the theme selection page on a wordpress website

Once you find the perfect theme, simply install it to begin customizing. Each theme has different steps required during the customization process, so be sure to follow them closely. If a theme has a website (often accessible through the WordPress theme and template library), check for documentation as you work through the customization process.

5. Add posts and pages to your website.

When you add content to your WordPress website, it’s usually displayed in the form of posts and pages.

Posts (or “dynamic pages”) are typically used for blogs and portfolios because they automatically place your newest website content at the top of your featured content. Pages are static, which is why they appeal more to business owners — the added content stays in the same place.

Posts and pages are the main post types in WordPress. Additionally, there are other native post types, as well as custom post types. For now, we can just stick to pages and posts.

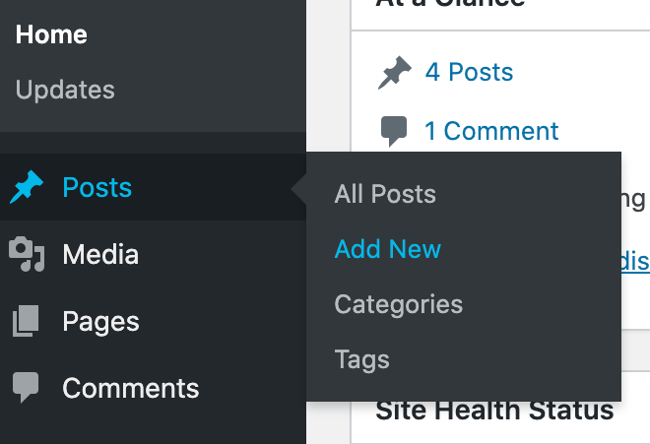
Start by deciding whether you want a post or page to serve as the homepage (or any page) of your website. To add a post to your website, go to the admin dashboard, click Posts and then Add New.

the dashboard menu on a wordpress website

You can add a title for your post, place photos, change the format, and insert page elements via blocks and shortcodes. Click Save Draft to save your changes as a draft, or click Publish to immediately take the post live.

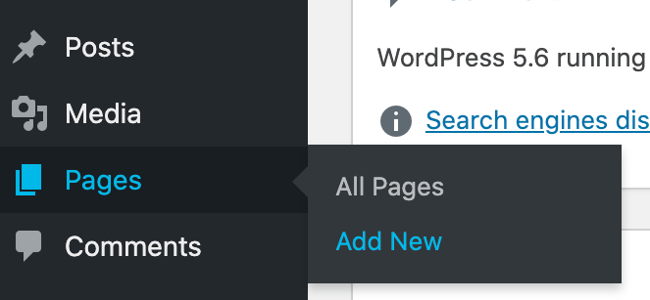
Adding a page to your website is a similar process. In your admin area, click Pages, then Add New.

the dashboard menu on a wordpress website

First, add a title to your page. Next, you can insert photos, embed videos, and add content. Follow the same steps to create multiple pages for your website. When finished, click Save Draft or Publish.

6. Customize your website.

Beyond the theme you choose, there are a number of ways to further customize your website. Let's review a few options.

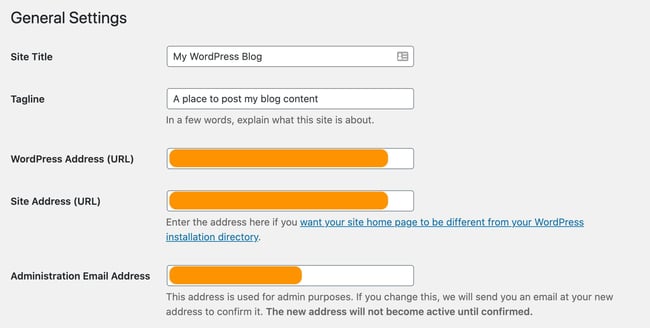
First, let's customize your site title. From your admin dashboard, select Settings > General. Here, add your website title and tagline. You can also toggle other basic site information like you URL, email, time zone, and more.

the general setting page on a wordpress website

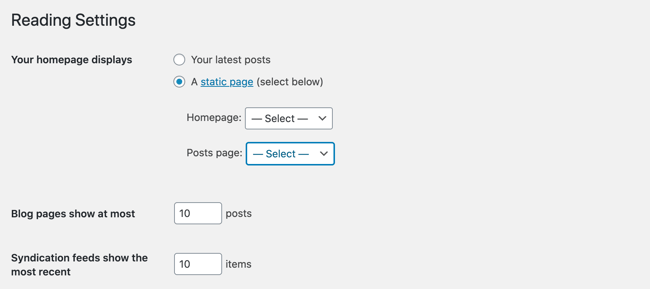
Next, let's customize your reading sections. Under Settings > Reading, you can change your home page to a static page.

the reading setting page on a wordpress website

Consider this if you’re a business owner who prefers having content remain in one place on your website. Consider using a dynamic page if you’re a blogger who prefers having your newest content appear at the top of your pages. This way, your visitors can easily find your latest posts.

The navigation bar is customizable, too. This enables your visitors to easily find information on your website.

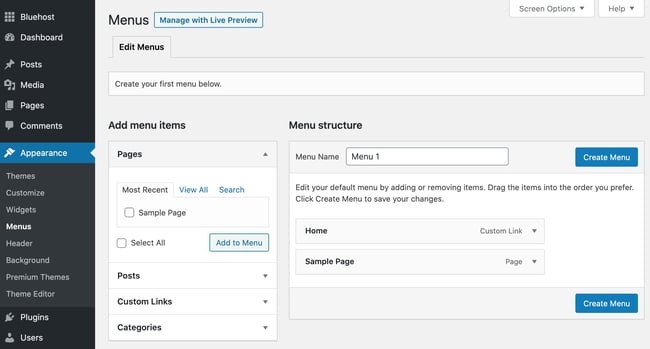
Add a navigation bar by going to your admin dashboard, clicking Appearance and then Menus.

the menus options page on a wordpress website

From here, you can determine how you want your bar to look, how many pages you want to include, what you want to title those pages, and what order you want them to be listed in.

Of course, this is just a fraction of what you can do in the dashboard — click here for more information on your WordPress site settings and customization options.

7. Install plugins.

Plugins are pieces of software that add functionality to your WordPress website and enhance the user experience. With over 55,000 available plugins, there are options for most every type of website and user. Some of the most popular plugins available include:

  • HubSpot WordPress Plugin: Easily add pop-ups, forms, and live chat to your WordPress website. And as an added bonus, pair this plugin, or other CRM plugins, with your HubSpot CRM.
  • The Events Calendar: An effortless events calendar that makes scheduling events from your site easy.
  • Yoast SEO: The go-to plugin to help you with on-page SEO. This app makes sure you’re following best practices before you push your site live.
  • TablePress: Need a table on your site? Look no further.
  • The SEO Framework: Another plugin that can help you master SEO on your site.

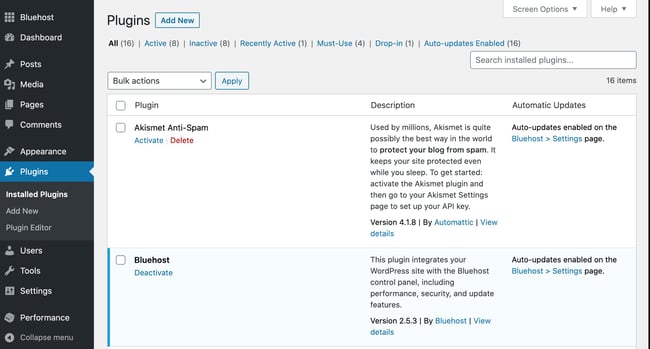
To begin installation, head to the Plugins section in your admin dashboard. This shows you all the plugins currently installed on your site. Depending on your host, you might have several plugins installed already. Note that for a plugin to work you must activate it after installing.

the plugins page on a wordpress website

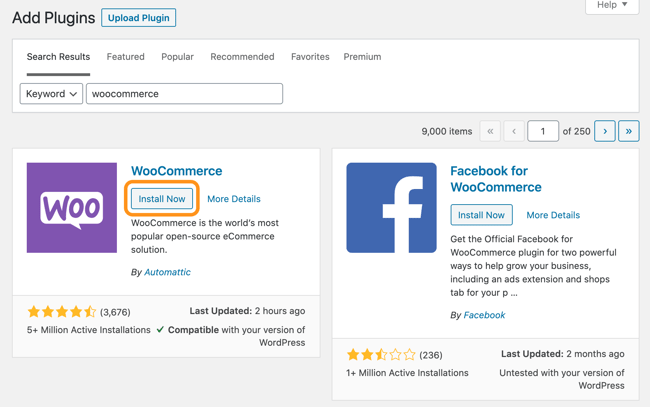
To add a new plugin, click Add New. Search for your desired plugin and then click Install Now, wait a few seconds, then click Activate.

the add plugins screen on a wordpress website

Get the WordPress CRM plugin that helps you organize, track, and nurture your leads.

8. Optimize your website to increase page speed.

Website performance is a critical part of the user experience. If a page takes too long to load, your visitors will move quickly to another site. You don't want to frustrate visitors with slow speeds.

You can improve your website's performance by enabling browser caching. Browser caching is the process of temporarily storing your website's data on your visitors' browsers. That way, your content doesn't need to be sent from the web server for it to appear in the browser, which increases the website speed.

To enable caching for your website, install and activate a caching plugin with the process described above.

9. Get inspired from WordPress website examples.

As you begin to customize your website, you may feel overwhelmed by all the options you have. Instead of starting completely from scratch, it helps to grab some inspiration from other exemplary WordPress websites. Here are some of our favorites:

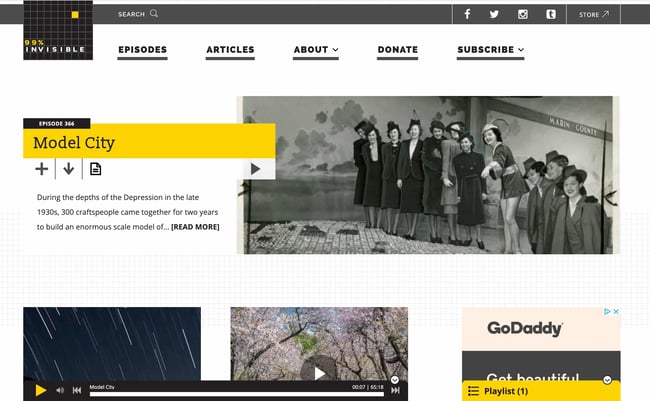
99% Invisible is a popular podcast that focuses on design and architecture. Their website is sleek, modern, and offers easy navigation for visitors to quickly access each podcast episode.

the homepage for the 99 percent invisible wordpress website

Image Source

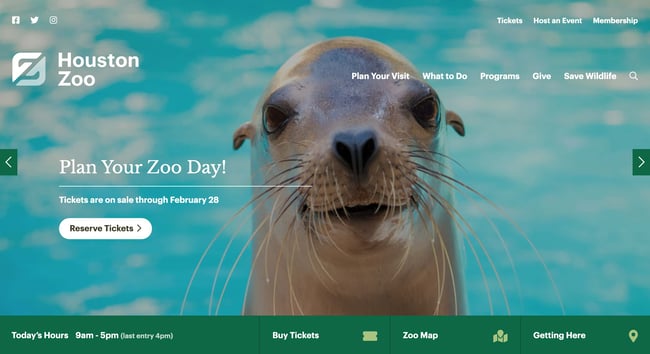
The Houston Zoo's website displays its main attraction on the homepage. The magnifying glass icon on the top menu bar makes searching the site effortless.

homepage for the houston zoo wordpress website

Image Source

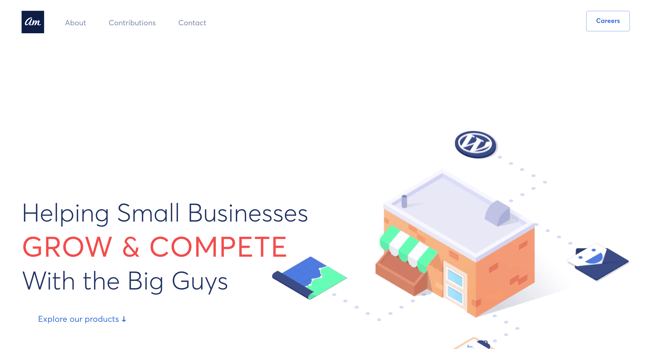
Awesome Motive, the creators behind several WordPress projects, engages their visitors with a polished, yet simple website. It features subtle animation to grab people's attention.

Awesome Motive WordPress website example

Image Source

WordPress Website Tips and Tricks

There are a number of WordPress tips and tricks to make your website as impactful and user-friendly as possible — we’ve listed 20 of them below to help you do just that.

1. Focus on the basics and create a great user experience with a WordPress theme that complements your business and website content.

2. Use dashes and not underscores when naming your files in WordPress. Google looks as underscores as joiners, meaning your file will look like one big word. That won’t help you with your SEO. Use dashes to make it obvious there are separate words. (For example, use https://ift.tt/2CWyE97, not https://ift.tt/2P8AhYz).

3. Use WordPress’ online support for any questions or concerns you may have while creating or using your website. There are a number of forums and ways to reach out to WordPress experts listed on their website.

4. Use Image Alt Text to your advantage. Image Alt Text can be used to improve your SEO and Google rankings.

5. Keep your sidebar as organized as possible. Stick to the essentials and think about what your website visitors and buyer personas really need quick and easy access to.

6. Back up your website regularly, so if you ever lose access or have technological difficulties, you have everything you need to completely restore your content. There are a number of plugins, such as Snapshot Pro, made specifically for backing up your WordPress content.

7. Learn and understand SEO basics to ensure your website is completely optimized so you can boost your conversions.

8. Create a custom homepage. As mentioned earlier, WordPress will provide you with a default homepage. Take the time to create your own with a theme that works for your business — remember, this is your visitor’s first impression of your business, blog, or portfolio.

9. Keep an eye on your website’s performance and know what is and isn’t working for your visitors. There are a number of useful WordPress plugins, as well as Google Analytics software, to help with this performance.

10. Include an “About Us” page on your website to show your visitors you’re a trustworthy person and/or business. “About Us” pages are known to be the second most-visited pages on websites (after homepages) — so introducing yourself is important.

11. Make sure your site is secure to ensure there are no hackers gaining entry. Again, there are plenty of plugins such as WP Defender to help you with security.

12. Create custom permalinks. Permalinks are the permanent URLs that you plan to keep static for the foreseeable future. They’re important because they improve user experience and enhance your Wordpress website SEO.

13. Create a custom navigation bar (as we reviewed earlier) to make your site easy to use for your visitors.

14. Include excerpts on your blog posts so people don’t land on your blog page and see your entire piece at once. By only including excerpts on your blog page, you make room to list all of your blogs in one location. Visitors can then read the excerpts and click-through to read the posts they are most interested in.

15. Structure your website in a way that makes sense for your business, visitors, and buyer personas. For example, use posts if you’re a blogger and use pages if you’re a business owner.

16. Remove “Comment” and “Share” buttons from specific pages of your website. You don’t need (or want) a “Comment” or “Share” button on your “About Us” page, or any of your service pages for that matter.

17. Consider what your website looks like on mobile. It’s no secret people are searching the Internet while on their phones, tablets, and other mobile devices these days. Consider using a plugin to help you achieve a responsive, mobile WordPress design.

18. Use visuals and video content when possible to break up the text on your website pages.

19. Update your WordPress site and plugins regularly. WordPress will tell you when updates are released. This will keep your website looking fresh and working efficiently.

20. Use social proof to show your new website visitors how many other people have already viewed your site and content. There are plugins to help you do this in a matter of minutes.

21. Pick a CRM that works with your WordPress site. A CRM can help you keep track of the way users are interacting with your website and company. Here's a list of some of the best WordPress CRM options.

Build a Website With WordPress

Having a great website matters. It’s how you connect with your visitors and leads, create a positive first impression with new users, and boost conversions. The good news is creating your own website doesn’t have to be a daunting process…at least not with WordPress.

The easy-to-use CMS offers completely customizable plans suitable for all needs. With no prior knowledge necessary, you can start building your own site for your business, blog, portfolio, or online store immediately.

Posted by https://bit.ly/31tHUKW

14 Essential Features for Taking Payments on Your Website

There are a lot of things I used to buy in person that I now buy online. I wouldn't call myself lazy, but it's just so much easier to carry a box of paper towels from my doorstep into my apartment than it is to carry it down the street from my local grocery store.

And I'm not alone. Whether it's because of the larger selection, better pricing, convenience, or something else, a lot more people are buying stuff online nowadays instead of in person. Despite the growing number of online shoppers, people are still wary of the setbacks of paying for stuff online. In particular, people still get nervous about giving their personal and credit card information to online retailers.

If you're an ecommerce business, a big part of attracting and delighting your customers will be providing them with a stable, reliable, secure, and smooth online shopping experience. That starts with creating your payment gateway.

How to Create a Payment Gateway

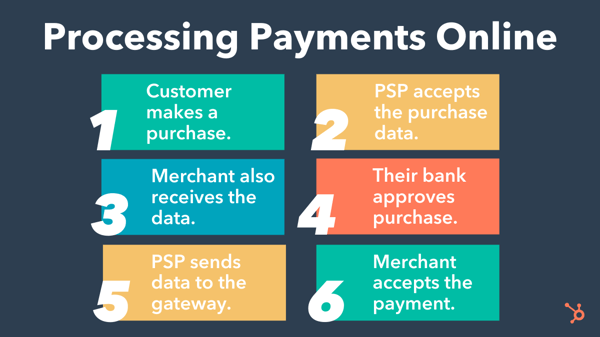
A payment gateway is a technological front-end component of payment processing that bridges the gap between your business's financials and the customer's financials during a transaction. To get an understanding of what I mean, it helps to know how payment processing works.

steps of processing payments online: customer makes a purchase, psp accepts the purchase data, merchant receives the data, their bank approves the purchase, psp sends data to the gateway, merchant accepts the payment.

On one hand, the customer's financial institution must approve or deny the purchase. On the other, your payment service provider (PSP) and merchant account need this data to process the transaction and receive payment. Coordinating these moving parts is your payment gateway.

Here's how to set it up.

1. Open a merchant account.

A merchant account is a type of business account that accepts payments of multiple types, including credit cards. Funds from online purchases land in your merchant account after they've been processed, and you'll then be able to transfer them into your business banking account.

In order to create a payment gateway, it helps to already have a merchant account set up as it will be the final destination for funds from successful transactions.

2. Choose a payment service provider (PSP).

While the gateway acts as the front-end of payment processing for a transaction (i.e. the interface that customers directly interact with), the payment service provider facilitates the transaction on the back-end, passing financial data across all the moving parts. In order to create a payment gateway for your customers to interact with, you must first set up a PSP to hook it up to.

3. Decide whether you want to build or buy your payment gateway.

You have the option to build a payment gateway yourself (custom) or partner with a provider to get one "out of the box."

Custom builds may be able to suit a wider range of your unique needs and save on transaction fees. However, it may be costly to develop and maintain.

An "out of the box" payment gateway is quicker to set up, but you'll want to ensure that it comes with all of the features that you need. Some may even come with PSP functionality, which saves you time during the setup.

Top gateway providers in the industry include Authorize.Net, Stripe, and PayPal.

If you plan to take payments on your website, then be sure you're checking everything off from the list below.

Essential Features for Taking Payments on Your Website

1. Multiple Login Options

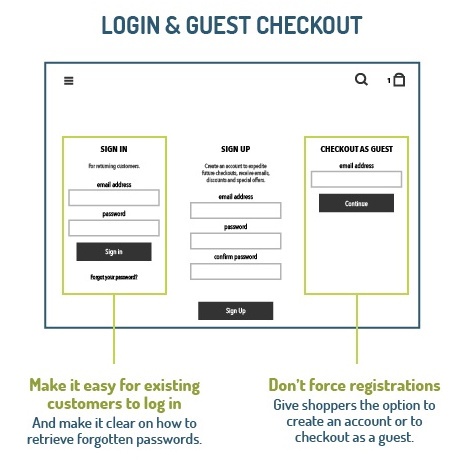
While it's more convenient for your marketing to require shoppers to create an account before placing an order, it doesn't always benefit your customers. You might lose people along the way if you don't give them the option to check out as a guest. Remember: You can always ask them to create an account once they've bought from you and feel a little closer to your brand.

example login and guest checkout

Image Credit: VWO

You should also think about offering shoppers the option of logging in with one of their social media profiles, like Facebook or Twitter. This can reduce registration friction because it makes the login process a lot faster. Make sure you add that you'll never post without the customer's permission, if applicable.

The caveat of allowing a social login? It's the one connection shoppers will have to log in -- and if anything changes about that connection (the terms of service for the social network change or they delete their account on the network), their ability to log into your site will change, too. So if you're allowing people to authenticate with social logins, figure out other ways ask for more contact information.

2. Authentication/Login Layers

Customers who do have an account with you want to know that their information is safe -- even if they forget their login information. To give them peace of mind, be sure to require several verification layers before you restore their login information. For example, if a customer forgets her password, your site could require various security questions before sending an email to a pre-determined email address.

3. PCI Compliance

The PCI Security Standards Council (PCI SSC) defines a series of specific Data Security Standards (DSS) that are relevant to all merchants, regardless of revenue and credit card transaction volumes.

If you host and manage your own ecommerce platform, it's your responsibility to ensure PCI compliance at the required compliance level, which is based on credit or debit card transaction volume over a 12-month period. Most SaaS shopping carts will have PCI compliance built in.

4. Integrated Payment Processor

While you can get away with payment processors like PayPal, Stripe, Google Pay, and Amazon Pay if you have a very small website and a low number of transactions, it's much better to integrate a payment process directly into your website.

With some processors, online shoppers get redirected off your website to a pay site that doesn't look like yours -- which disrupts their experience, visually disconnects them from your brand, and can be confusing or nerve-racking and prompt them to abandon their cart.

An integrated payment solution that processes your customers' information on your own server allows for more flexibility and customization. Plus, it's a much smoother experience for your customers.

An integrated payment page will require an SSL certificate to ensure a secure connection. Which brings me to my next point...

5. SSL Certificate

Every ecommerce website needs an SSL certificate to protect customers' personal and credit card information. SSL is the standard security technology that makes sure all data passed between a web server and a browser remain private.

Without it, hackers can steal your customers' information -- and online shoppers won't feel safe submitting their information on your website. Online shoppers will be able to tell your website's secure when they see an "https://" at the beginning of your URL, as opposed to just "http://".

Read our article to learn how to get an SSL certificate on your website.

6. Credit Card Logos and Security Seals

Speaking of keeping online shoppers at ease, you might want to add credit card logos and security seals to your website to reassure shoppers that your site is a secure, trusted place to do business. Make them visible at least in the shopping cart and checkout phases of your site, or even try integrating them into the footer of your website.

7. Checkout Buttons

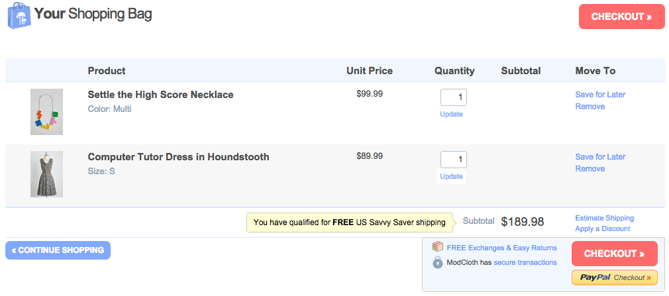
The less time customers have to spend looking for an option to check out, the sooner they'll take action and buy. We recommend putting checkout calls-to-action -- in a color that really stands out -- at the top and bottom of your web pages.

Check out this checkout button example from ModCloth (no pun intended):

checkout button example from modcloth

Want a little button design help? Click here to see get free call-to-action templates.

8. Visual Checkout Process

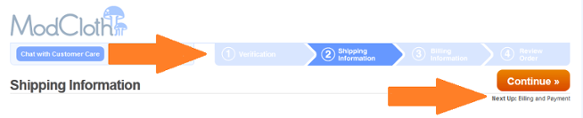
If you need to spread the checkout process across multiple pages, give shoppers a visual indicator of how far they've progressed and how long they have left to go. Again, ModCloth does this particularly well:

visual checkout process example from modcloth

9. Return & Refund Policy

Shoppers don't get to physically look at or feel a product before they purchase it online, which can make some people nervous and disincentivize them to buy. To help mitigate this, make your return and refund policy readily available. Consider making it part of the checkout process and even putting it in the footer of your website.

Be sure your policy is succinct, informative, engaging, and easy to understand. Say whether the customer will get a refund or an in-store credit, stipulate a timeframe for returns, define the condition you expect the product to be in, and disclose any fees up-front -- like who will cover the cost of shipping.

10. Clear Path to Your Contact Information

Online shoppers want to know they can easily reach your company for support -- especially if they're first-time customers. If you don't give them a clear path to your contact information, they may either hesitate to buy from you, or they may not get the support they need to complete a transaction.

Include contact information like a phone number (with availability hours), email address, street address, and social media accounts. Preferably, list this information as text (not as an image) so it'll get picked up by search engines in local searches. Some retailers also like to offer live chat options -- just be sure that you've integrated it with your customer records so you can build smarter marketing campaigns in the future.

11. Detailed Confirmation Page Before Checkout

Before allowing online shoppers to check out, you'll want to take them to a detailed confirmation page before finishing the transaction. This page should let them review their cart, give them the option to change the quantity or remove items, include a final price (including tax and shipping), and indicate when the items will be shipped.

12. Optimized Checkout Page Design

The best checkout pages are functional, secure, attractive, and easy to use and navigate. The last thing you need is someone with purchasing intent getting cold feet at the last moment simply because they can't use your system or don't have faith in it.

13. Mobile Payments

Buyers don't just buy on desktop. They also buy on mobile, so your payment gateway must be responsible and easy to navigate for mobile users too. If your have a mobile app, you may also need additional functionality to process payments on iOS and Android.

14. Confirmation Email

Finally, you'll want to create a confirmation email that includes the order number, the product, payment, and shipping information, and your return and refund policy -- just in case. If possible, use a real "from" email address (instead of noreply@company.com) that can be answered by a member of your customer support staff. You'll also want to make the order confirmation page easy to print. This is the time when you can offer guest customers the option to sign up for an account, too.

Setting up your ecommerce business is exciting, even if all the details can be a little overwhelming. With a little bit of planning, you'll be well on your way to processing ecommerce transactions left and right.

Editor's note: This post was originally published in September 2015 and has been updated for comprehensiveness.

Posted by https://bit.ly/31tHUKW

How We Prioritized Which Review Sites We Care About at HubSpot

This post is a part of Made @ HubSpot, an internal thought leadership series through which we extract lessons from experiments conducted by our very own HubSpotters.

HubSpot CEO Brian Halligan has said it many times: More businesses die each day from overeating than from starvation. They spread themselves across so many different priorities that it becomes impossible to gain major traction with any of them.

The same is true when it comes to managing customer reviews for your business. There are so many different places a business can be reviewed today that keeping them all in order can feel a bit like a game of Whac-a-mole.

(A few examples would be G2, Gartner Peer Insights, and Capterra.)

This was the problem we faced at HubSpot. If we tried to give the same care and attention to every single review site, we’d only have a minimal impact on each site. While it was important for us to read and consider every piece of feedback, it was also crucial for us to understand which sites were going to have the most impact in moving HubSpot’s mission forward: helping millions of organizations grow better.

However, how exactly could we determine which sites were likely to have the greatest impact? We needed to figure out which sites were wholesome brand-builders and which were just tasty distractions.

This is why I developed HubSpot’s “Customer and User Review Scoring Algorithm”. I designed the algorithm so we could objectively consider dozens of different criteria that assess the importance of various third-party sites. With this algorithm, we could determine how to focus our efforts over the coming months.

The Components of the Customer and User Review Scoring Algorithm

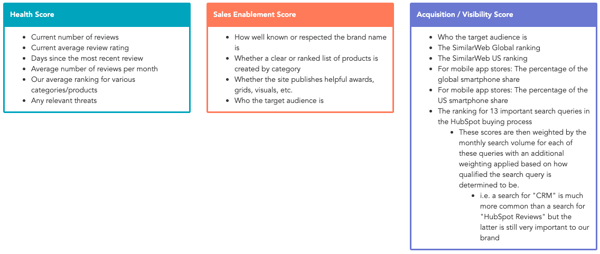
I realized that, for our specific business (as an inside sales-based SaaS company), there were three primary scores necessary to gain a full perspective of the review sites in our orbit:

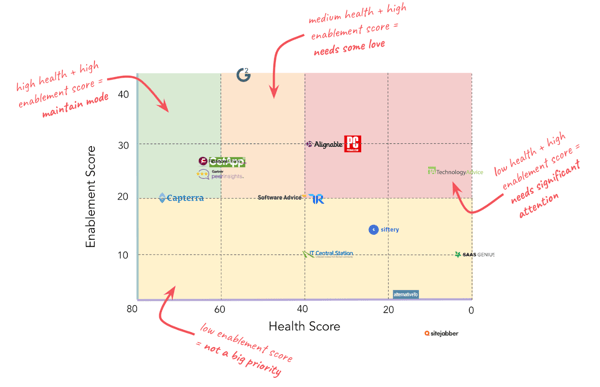
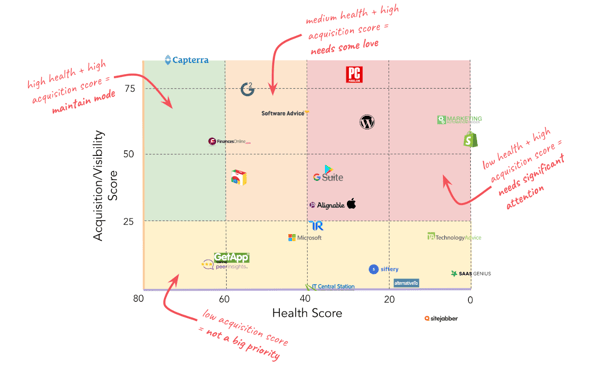
  1. Health Score: How positively is HubSpot currently represented on this site?
  2. Sales Enablement Score: How important is this site to sales enablement?
  3. Acquisition/Visibility Score: How important is this site to the acquisition of new users or the general perception of HubSpot and its products?

For each score, I chose a variety of criteria I could measure (see below) and scored each site against the criteria. I was then able to weigh the criteria against each other so that criteria we deemed more important would have a greater influence over the score.

For example, we determined that our review rating (out of 5) on each review site was more important than the overall number of reviews we had on each site.

How We Prioritized Which Review Sites We Care About at HubSpot

See above all of the criteria I used to create each score, and click here to see an example Google Sheets template of the scoring rubric.

Leveraging the Customer and User Review Scoring Algorithm

To truly understand each score and how the different review sites stacked up against each other, I plotted the data on two different grids. This process allowed us to see the Sales Enablement Score and Acquisition/Visibility Score each plotted against the Health Score.

The grids below represent what this looked like for HubSpot a couple of years ago. The colors of the grid correspond to how much attention should be devoted to improving HubSpot’s health on the given site (see the corresponding notes in red).

The Sales Enablement Grid — English Focused

how hubspot prioritized review sites enablement and health score matrixThe Acquisition/Visibility Grid — English Focused

how hubspot prioritized review sites acquisition and health score matrix

Armed with objective data and these handy grids, I was not only able to better direct my own review-oriented efforts, but I was also able to gain much better alignment and buy-in from other teams that leverage or impact customer reviews.

As a result of the campaigns that came out of this research, we were able to drive hundreds of five-star reviews, bring up our star rating on our goal sites, and influence countless deals.

If you’re looking to spin your business's flywheel and acquire new customers, then a positive online reputation is a must-have. Approaching these reviews can feel a bit intimidating simply because of the sheer volume of websites, but fear not! Armed with this scoring system you can boil down the ocean and focus your attention purely on what matters.

Check out this template to get started today!

Posted by https://bit.ly/31tHUKW

How To Make a Vlog [Step by Step]

I will argue with alarming confidence (and no actual data) that 90’s kids were the original vloggers.

When I was about 14 years old, someone handed me a digital camera that I spent hours talking to. I would take my audience (AKA me) on my teen adventures and say things like, "Hey guys, it’s Martina. Today, my cousin and I are going over to her friend’s house." Exciting stuff. Thankfully, that footage never saw the light of day.

When YouTube first launched, people like me finally had a platform to share stories, entertain, and educate. But then, vlogging evolved into what we know it as today: a sustainable income source for influencers and an effective content marketing tool for brands.

So, how do you start vlogging? We’ll cover that and more here.

1. Feel out the competition and find your niche.

Before you pull out your camera and start filming, you’ll have to do some strategizing. It starts with finding your niche.

This means narrowing down what your vlog will cover based on your brand, audience, and demand.

Starting with your audience: Does vlogging align with your user persona? This is critical, as you want to meet your audience where they are. Imagine creating these high-quality videos for YouTube, but your ideal customer lives on Facebook and prefers short-form videos. In this case, you would have wasted time and resources. So, start by reviewing your persona and ensuring this venture is a worthy investment.

Here are additional steps you should take to narrow down your niche:

  • Confirm the demand for your content – Use tools like Google Trends and Google Keyword Planner to double-check the interest in the type of content you will be producing. This is a useful step to generate video ideas during the initial planning phase as well as later on, when the channel is live.
  • Check out your competition – How many brands are currently creating the content you’d like to produce? To get your answer, head to YouTube, put your keywords in the search bar and go through the videos on the results page. This will tell you how saturated the market is and the difficulty level to stand out.
  • Brainstorm your approach – Once you know who your competitors are, analyze their content and develop a fresh, unique approach to fit your audience.

2. Develop a content strategy.

Now that you’ve found your niche, here comes the fun part: content planning.

Just as you would for a blog or social media account, you want to break down your content ideas. Start with broad topic clusters and work your way down to specific videos. If you’re having trouble, HubSpot’s Business Blogging course can serve as a great foundation for structuring your content.

From there, you can group your ideas into series, which work great on vlogging channels. Think of them as segments on a TV show. They fall under the broader topic but only cover something specific. For instance, let’s say Tasty wants to start a food vlog. There are several subseries they could have, including:

  • Recipe series.
  • Food shopping series.
  • Cooking accessories series.
  • Food tasting series.

Social listening will also help you keep your ear to the ground and generate new content ideas.

With vlogging, there’s an additional layer of planning involved. Will you need any props for filming? Do you need to be at a particular location? All of this will call for advanced planning to ensure filming goes smoothly.

Once you know what topics you will cover, tackle the less concrete areas. What will be your channel’s aesthetic and style? Is it light and airy or dark and moody? It’s important your vlog channel matches your overall brand. So, go back to your brand identity and use that as your guide to design your channel.

3. Invest in your equipment.

Having a successful vlog isn’t only about having great content. It’s also about having the right equipment to produce high-quality videos. Every video you produce needs:

  • A camera that captures in-focus subjects.
  • Clear and crisp audio.
  • Lighting to match the brand’s aesthetic.
  • A non-distracting background that supports the foreground.

If you’re on a budget, here are a few essentials to get you going:

  • A ring light or softbox for lighting.
  • A lav mic for audio.
  • A phone with a camera.
  • A phone stand or tripod.
  • A backdrop, if you want an empty background.

As your channel grows, you can invest in additional equipment.

4. Film and produce in batches.

One of the benefits of content planning is that you can then film multiple vlogs at once. Batch filming will save you hours of set up and make scheduling a breeze.

Start by looking at the content you plan on filming over the next few weeks. Then, see which ones can be filmed together.

Keep in mind that not every series will allow for batch-filming. For instance, if some of your vlogs will consist of behind-the-scenes footage, this strategy won’t work. Batch filming works best for videos within the same series with little to no change in the setting, like talking head vlogs.

Once you know which ones you will film, it’s just a matter of scheduling.

5. Optimize your vlog channel.

Once you’ve filmed and edited your video, there’s another step to complete before it’s ready to be published.

The first is making a thumbnail. It’s one way viewers will decide if they want to watch your video. While you can simply take a screengrab from your vlog and use that as your thumbnail, you’ll likely want to stand out with a custom thumbnail.

YouTube’s Creator Academy recommends these following specs for your thumbnail: 1280 x 720 pixels (16:9 ratio) with a resolution up to 2MB.

Next up is your video title. It’s key to gaining your audience’s interest and for SEO. Whenever you’re writing one, keep these tips in mind:

  • Include your main keyword in your title.
  • Keep your title under 70 characters.
  • Use numbers and eye-catching words to grab attention. I.e.: "X Ways to Boost Your Brand Awareness."

Don’t forget about your video tags and descriptions. View these as additional SEO opportunities to rank higher for search queries and help audiences find your content.

6. Upload consistently.

Vlogging is a slow and steady venture that requires consistency. Yes, it’s important to have high-quality content but you can lose your audience if you don’t maintain a regular publishing schedule.

Think of your favorite TV shows. Isn’t it the worst when you’re expecting a new episode but it doesn’t air because of a football game or holiday? Well, it’s the same for vlogging.

Audiences expect consistency. When they don’t get it, they’re more likely to seek out other brands.

7. Analyze your metrics and optimize.

Once your channel begins generating views and subscribers, you can analyze your metrics to review each video’s performance.

Metrics like average watch time and audience retention can tell you if your content is resonating with your audience. Re-watches can help you identify subtopics of interest and develop more content ideas.

Impressions and click-through-rate (CTR) will tell you how attractive your thumbnail and title are. If the rate is low, you may need to try different titling strategies or use a different thumbnail template.

As with any venture, there’s trial and error involved. Analyzing your vlogs’ performance will give you the data you need to grow your channel.

1. Get familiar with the vlogging style.

There are two main types of vlog styles:

  • The documentary-style "talking head" where the vlogger sits in front of a static camera and discusses a topic for educational and/or entertainment purposes. Brands often use this for how-to videos.
  • The "come-with-me" style where the vlogger takes the audience with them to various locations. When showing behind-the-scenes or a day in the life, this style is very popular.

If the video requires it, you can also combine these two styles within one video. You can also use the styles interchangeably from one video to the next.

One mistake brands can make is take their approach to social media videos and TV, and apply it to vlogging. Vlogging audiences tend to look for longer videos that go in depth on a given topic, unlike the short, viral-friendly content you’d typically see on TikTok or Instagram.

With audiences craving more authenticity from brands, vlogs are a great opportunity to show the faces behind your brand and engage with subscribers.

2. Build from a three-act story approach.

A vlog typically follows a similar storytelling format to a blog. When a viewer lands on your video, they expect an introduction to the topic followed by a deep dive. It then ends with a recap of what was discussed and a call to action.

Following this simple story structure will help you develop the content for each section of the video without straying off course. Writing video scripts is another way to make sure you cover key points in your video.

Pro-tip: Use a teleprompter app to deliver your script seamlessly without looking rehearsed.

3. Encourage viewers to engage with your vlog.

Comments, likes, shares are some of the ways your audience can engage with you on your vlog channel. But how do you encourage that behavior? It starts with your video.

Your video should include ways for your viewers to join the discussion. A simple call out like "Tell us your thoughts on X in the comment section," or "Put a thumbs up if you agree," urges your viewers to jump in.

Incorporating subscribers’ comments or suggestions in your future videos is another way to encourage participation and drive your engagement rate up.

4. Vlog from your phone (if that’s your style).

Depending on your budget and the style you’re going for, you can choose between vlogging from your phone or camera.

Vlogging with a phone can give a more intimate and informal look to your vlog. It’s often used to show behind-the-scenes footage or when taking the audience on an adventure with you. However, you do sacrifice image quality when filming from a phone.

If you’re on a budget, a phone will do. As your vlog channel grows, it’s worth investing in a lightweight camera that works in different lighting conditions and has key features like image stabilization and mic inputs.

How to Edit a Vlog

Use video editing software.

When filming a vlog, you’ll inevitably pause from time to time, make mistakes, or need to reshoot something. This is where editing comes in handy.

Editing videos allows you to cut down your video to keep the most important parts. There are many video editing software available ranging in price, ease of use, and features. The most popular options include:

  • iMovie(free) - This is a great beginner option if you are on a budget and own an Apple product. This software has basic editing capabilities with a sound and music library.
  • Apple Final Cut Pro(One-time fee of $299.99) - If you want to take your editing to the next level, this is a great option. It offers a large array of templates, plugins, and audio mixing settings.
  • Adobe Premiere Pro(Starts at $239.88/year) - With features like scene edit detection and virtual reality editing, Premiere is one of the best editing tools on the market. It’s ideal for brands who are producing videos frequently and require advanced editing features.

Create an intro.

A good vlogging intro serves the same purpose as your favorite show’s theme song. It helps build a connection with your audience and helps maintain consistency.

There are a few different approaches you can take with your intro. Some brands keep it simple with a simple frame of their logo while others prefer intros that give more context into the channel with voice-overs or animation.

Whatever you choose, be sure to use that intro in every video you publish.

Add sounds and music in the background.

Think of a scary movie without any terrifying music to build up the moment. Not the same, right?

Sounds and music are subtle touches that can keep your audience engaged in your content.

One thing to keep in mind is that YouTube is very strict about the use of copyrighted material. You must use royalty-free music or risk having a muted video your audience can’t enjoy.

Thankfully, there are several free music libraries online to find royalty-free music, including YouTube Audio Library and ccMixter.

Be sure to check the fine print before downloading, as some sites require you to credit the artist on your video. If you want a wider selection of music, you will likely need to subscribe to a royalty-free music library platform.

How to Start a Vlog Channel

Pick a Vlogging Platform

YouTube

YouTube is the second largest search engine behind Google and the most popular vlogging platform. According to the Pew Research Center, 73% of adults report using it, most users between 18 and 49 years of age.

So, naturally, it’s where most brands and influencers launch their channel. The platform also allows its content creators to monetize their videos with ads, offering an additional source of revenue.

YouTube is also one of the most lenient platforms when it comes to video length. Users can post videos up to 12 hours. But, like I tell myself when I’m tempted to eat a bag of gummy bears: even though you can, doesn’t mean you should.So, while the option is there, most brands should probably stick to videos under 30 minutes.

Find the steps to create a YouTube channel here.

IGTV

As soon as Instagram launched IGTV, it became another vlogging platform. Users can categorize their IGTV videos by series, which makes it easy to navigate. However, unlike YouTube, content creators are restricted to 20-minute videos.

A major benefit to this platform is the fact that it’s an all-in-one experience. Followers can scroll down a brand’s timeline to see their pictures and videos as well as shop their products.

With Instagram being an influencer hub, brands could benefit from collaborating with influencers for IGTV vlogs.

Vimeo

Although less popular, some brands use Vimeo to post their vlogs. Back in 2019, the site had a reported 170 million active monthly users. One benefit of using this platform is that there’s less competition, making it easier to stand out.

What Makes a Vlog Successful

According to a report by CNET, 70% of the videos users watch are recommended by the platform’s algorithm. So, getting on the algorithm’s proverbial good side is a great advantage.

The first tip for success is creating content that matches your audience’s interests. Google reported that when deciding what to watch, YouTube viewers choose interest over production value at 1.6 times the rate.

Some publishers report that the algorithm favors longer videos. However, spokespeople from YouTube have said it doesn’t prioritize by length, but instead by interest. The better a video performs, the more likely it will get recommended.

So, by focusing on creating high-quality content that aligns with your audience, you can have a highly successful vlog that’s engaging and drives traffic to your brand.

Posted by https://bit.ly/31tHUKW